

Harry Potter Games Lego Online to Play Easy
Table of Contents
- Introduction
- Version History
- Controls
- Spells and Abilities
- Terms and Abbreviations
- Tricks of the Trade
- Diagon Alley
- Hogwarts
- Overview of Hogwarts
- Detailed Maps
- Walkthrough
- The Magic Begins
- Out of the Dungeon
- A Jinxed Broom
- The Restricted Section
- The Forbidden Forest
- Face of the Enemy
- Floo Powder!
- Dobby's Plan
- Dueling Club
- Crabbe and Goyle
- Tom Riddle's Diary
- Follow the Spiders
- The Basilisk
- News From Azkaban
- Hogsmeade
- Mischief Managed
- The Shrieking Shack
- Dementor's Kiss
- The Dark Tower
- The Quidditch World Cup
- Dragons
- The First Task
- Secret of the Egg
- The Black Lake
- The Dark Lord Returns
- Harry's Destiny
- Bonus Levels
- Bonus Level 1
- Bonus Level 2
- Bonus Level 3
- Bonus Level 4
- Bonus Level 5
- Bonus Level 6
- Bonus Level 7
- Bonus Level 8
- Bonus Level 9
- Bonus Level 10
- Characters
- Extras
- Copyright and Hosting
- Contact
Introduction
Let me preface the introduction by warning you that this game is Tom Riddled with bugs/glitches that have ruined many players' experiences. To avoid the biggest and permanent ones, simply do not exit to the Leaky Cauldron while in a level you have not beaten. Doing so may cause the game to continue on as if you had finished the level, but not letting you go back to it at all. You'll know you're in a level if there is a bar at the top of the pause screen made of stacked studs. Having said that, this game is still very much enjoyable and fun, though caution is needed if you want to get everything.
This guide is intended to get you through the game Lego Harry Potter: Years 1-4 while getting all of the characters, extras, and gold bricks. In the Walkthrough sections, I'll explain how to simply make it through to the end. How to get all of the hidden things (student in peril, character tokens, and house crests) will be highlighted to make finding them easier, since most of them require you to come back with spells and/or abilities you don't have access to the first time.
Since at Hogwarts you have Nearly Headless Nick to get you from point A to point B, I won't waste words on that. All I'll provide is a map of each and every room, labeling how to get past obstacles and where to find gold bricks, students in peril, character tokens, and red bricks.
Version History
1.00 - Completed the story mode. Walkthrough and Hogwarts sections are completely done. 7/21/10
1.25 - Finished the Extras, Characters, and Bonus Levels sections. Added the final level Harry's Destiny to the walkthrough. 7/23/10
1.50 - Added a new flow chart map of Hogwarts and links under detailed maps to facilitate navigation, added locations to Characters section, added codes to unlock Extras, and finally added in those missing True Wizard totals. 2/11/11
Controls
Seeing as I'm writing this guide for the Wii version of the game, these controls are, rather obviously, for the Wii version. If you're playing another version and have questions about the controls, you probably know more about them than I do.
- A
- Selects/toggles menu choices
- Jump
- While riding a broomstick, rise higher. Some characters aren't skilled enough to do this.
- B
- Cancel out of menus
- Fire a shot from your wand. This is your bread and butter for exploring, as well as fighting.
- Hold B to cause a blue circle to appear. Point the Wiimote at the screen to direct this circle. When you pass over something that responds to being shot, a smaller circle will appear and stay on the object. You can target multiple objects at once. This also automatically selects the correct spell for each target (assuming you know it).
- Dig with certain characters
- C
- Switch to one of your partners
- Hold C to access the spell wheel. While still holding C, use the control stick to select the spell you want, then let go. This is the only way to change spells in freeplay mode.
- Mount/dismount brooms and vehicles
- Z
- Activates/shoots the spell from the spell wheel you have selected
- Activate thing-a-majig when standing on orange circle. These things often require a certain character or type of character in order to work.
- Pick up/deposit potion ingredients, keys, and other objects that have an arrow over them
- +
- Pause/unpause
- 1
- Move the spell wheel counter-clockwise
- In freeplay, change to the next character up in your party
- 2
- Move the spell wheel clockwise
- In freeplay, change to the next character down in your party
- Control Stick
- Highlight different menu choices
- Move your character
- Control Pad
- Slightly adjusts the camera position. When targeting with B, it does this automatically if you move the cursor past the edge of the screen.
Spells and Abilities
At the beginning of the game, your magical knowledge is exceedingly lacking. By attending lessons, you can learn more spells and abilities, which will allow you to access new areas or defeat new creatures. Each spell will have a place and color on the spell wheel. The spells you purchase at Wiseacre's are not included because they are a waste of studs whose only reason for buying is to get 100.0%.
- Wingardium Leviosa - pink/purple
- Learned in your first charms lesson of the first year
- Use it to manipulate objects that have a pink glow. The glow only shows up when WL is the selected spell. For this reason, you should keep it on as you explore.
- Some objects can be freely moved while being WL'ed. Move them around with the control stick. Quite often, you need to build something by doing this. Position the piece where you want it and it can "snap" into place. When building stairs, this is essential to secure the piece, otherwise it may tip and fall over when you jump on it.
- Lumos - white
- Learned in your second charms lesson of the first year
- Use it to light the tip of your wand, illuminating dark areas
- With your wand lit, you can approach vines and cause them to retreat. Be careful with the vines that wiggle and lay flat on the ground, they will hurt you, even while retreating.
- Lumos Solem - white
- Learned in your first herbology lesson of the first year
- This is an upgrade to the Lumos spell. Now you can shoot light with Z.
- Use it to destry devil's snare, which looks like three spiky vines wiggling straight out of whatever they're growing out of.
- Invisibility Cloak - green
- Learned at the start of The Forbidden Section
- Only Harry can use this, which makes him invisible
- Use it to sneak past Filch, prefects, and other naughties
- Pets - green
- Allows you to control the character's pet
- Pets can squeeze into pet tubes to press otherwise inaccessible switches
- Ron can control Scabbers until the third year, Hermione can control Crookshanks from the thrid year on, and Neville can control Trevor
- Immobilus - blue
- Learned in your first defense against the dark arts lesson of the second year
- Used to destroy pixies (the little blue flying guys, often holding something out of your reach
- The first hit freezes them, the second hit shatters them. They only stay frozen for maybe ten seconds, so don't waste any time getting the second shot in.
- Expeliarmus - red
- Learned in the second year
- It disarms the target
- Don't bother using it, it doesn't help you at all
- Riddikulus - yellow
- Learned in your first defense against the dark arts lesson of the third year
- Use it to defeat a boggart, which pops out of a chest and causes your character to cower in fear
- Harry is the only one not to learn it
- Expecto Patronum - white (the one on the left)
- Harry learns this sometime in the third year
- Use it to kill dementors. Unless the dementor is coming at you, just press Z to fire it. If the dementor is after you, target it and fire. The wind up for this spell takes a whole second, during which time the dementor can hurt you. If he does, cast again as soon as you can.
- Reducto - brown
- Learned in your first defense against the dark arts lesson of the fourth year
- Use it to destroy shiny silver things that just deflect other spells
- Once you get this spell or a character that already knows it, you can access quite a few of the hidden things you couldn't before
- Avada Kedavra - green
- Only select dark wizards have this
- It instantly kills most characters (never bosses)
- Crucio - pink/purple
- All dark wizards know this
- It takes the place of WL, but still does everything WL can
- Use it on objects that have red sparkles and glow red
- Using it on some characters will hurt/kill them
The following are abilities specific to certain characters. Abilities are often activated by pressing Z on an orange circle.
- Strength
- This lets you pull chains.
- Hagrid, Fang, Krum, and Wolf Lupin natively have Strength.
- Any character can gain strength temporarily by drinking a Strength Potion.
- Parselmouth
- This lets you activate snake doors.
- Harry (after the dueling club), Tom Riddle, and Lord Voldemort are Parselmouths.
- Rune Reader
- This lets you open rune cabinets.
- Only Hermione and Professor Dumbledore have this ability.
- Time Turner
- This lets you access a different version of a room (or rooms).
- Hermione gains this ability after the level Dementor's Kiss.
- Adults
- This lets you cross age lines.
- Just about anyone who isn't a student is an adult.
- Any character can temporarily gain this ability by drinking an Aging Potion.
- Goblin
- This lets you open safes.
- Only Griphook can do this.
- Digger
- This lets you dig up spots that have blue paw prints rising from them.
- Fang, all cats, and Professor Sprout can dig.
- Dark Wizard
- This lets you interact with objects that have red sparkles. It works just like Wingardium Leviosa and takes its place.
- Tom Riddle and Lucius Malfoy are the easiest dark wizards to unlock.
- Gryffindor
- Lets you into the Gryffindor Common Room.
- Harry, Ron, and Hermione are Gryffindors.
- Hufflepuff
- Lets you into the Hufflepuff Common Room.
- Justin Finch-Fletchly is a Hufflepuff.
- Ravenclaw
- Lets you into the Ravenclaw Common Room.
- Penelope Clearwater is an easy to unlock Ravenclaw.
- Slytherin
- Lets you into the Slytherin Common Room.
- Tom Riddle, Draco Malfoy, and Harry (Slytherin Disguise) qualify.
Terms and Abbreviations
The following abbreviations are used throughout the guide to save a lot of keystrokes.
WL = Wingardium Leviosa
EP = Expecto Patronum
The following terms may or may not be the "official" names for things, but to avoid confusion, I'll explain them here.
Chain - It's literally a chain sticking out of the wall. It requires a character with Strength to pull it.
Rune Cabinet - A cabinet with four runes on the front of it. Activate it with a Rune Reader character and watch the order the runes flash in. Highlight and select the runes in the same order to open the cabinet.
Pet Tube - A large pipe that you can send a pet into. There are often switches inside the tubes to press.
Snake Door - A snake pops out when you approach. Have a parselmouth stand on the orange circle in front of it and press Z.
Clock/Grandfather Clock - A clock with an orange circle in front of it. These are the only places you can use a Time Turner.
Studs - The currency of the game. Silver ones are worth 10, gold are 100, blue are 1,000, and purple are 10,000. Studs can be found on the ground, in the air, and can appear when certain actions are performed (like shooting or WLing something). Studs are lost when you die.
Niffler - Nifflers are the little black mole-like creatures that sometimes stick their heads above ground. Shooting them will cause studs to appear.
If you see me use any other abbreviations or unclear terms, please Contact me and let me know. If you're not sure what something means, there are likely others who don't, too, so help them out.
Tricks of the Trade
If it looks like it's made of legos, you can probably do something to/with it, often getting studs. Shoot it with B, target it and see if you have the right spell, and try WL.
If you get caught in devil's snare, by filch or just on some object, switch characters.
When hunting for studs, check the bottom of the screen or areas you can't see, but can walk to. You'll often find gold, blue, and purple studs in these areas.
If there's a vehicle (frogs in the water, pumpkins, plungers, mops) hop on. Rarely are they there for no reason. With broomsticks, fly high. Several character tokens are hidden way up in the air, as well as plenty of studs.
Paintings with orange frames will often do something when shot.
As soon as you learn Reducto, you can unlock every character type. I recommend that you get Griphook from The Magic Begins, then Tom Riddle from The Basilisk, Dobby from Dobby's Plan, and Hagrid from The Forbidden Forest. With these characters (and Harry and Hermione), you'll have the abilities of flying and shooting (Harry), invisibility cloak (Harry), rune reader (Hermione), pet (Crookshanks with Hermione), goblin (Griphook), dark wizard (Tom Riddle), strength (Hagrid), digger (Crookshanks with Hermione), adult (Hagrid), parselmouth (Harry and Tom Riddle), and Dobby fills the roll of all four school houses (Gryffindor, Ravenclaw, Hufflepuff, and Slytherin). These are all the abilities needed to get everything in the levels, everything in Hogwarts, and everything in Diagon Alley and the Bonus Levels.
Diagon Alley
Diagon Alley is the place to be if you want to purchase some characters or extras you unlocked, replay a level you've completed, want to play a bonus level, or build your own.
The Leaky Cauldron - This is where you start whenever you load a save file. The door at the front right will let you continue with the story or take you back to Hogwarts. The bulletin board just below the stairs lets you replay levels you've completed. The trapdoor beyond the stairs (use Reducto to remove the lock) leads to a basement where, if you have all 24 gold bricks from the levels of a particular year, you can build a model and earn another gold brick (four in total). Up the stairs is a door that leads to a room where you can view the cutscenes you've seen. The door at the back leads to Diagon Alley.
Madam Malkin's Robes - This is the first shop as you head down Diagon Alley. Purchase the characters you have unlocked at the counter. For a list of characters and prices, check the Characters section. Through the left curtain at the top of the stairs you can make custom characters. Stand in front of the right curtain to unlock Harry (Tuxedo). Reducto the left clothes rack (the one in the middle of the floor, you may have to shoot it a lot) and WL the clothes back into place to unlock Hermione (Ballgown).
Eeylops Owl Emporium - The second shop in Diagon Alley. You can purchase twelve gold bricks at the counter. Upstairs you can buy the Extras you've unlocked. Shoot the white cage and WL the pieces to make a sweeping machine. Drive it all over the floor, getting rid of the grey areas, to earn a gold brick.
Wiseacre's Wizarding Supplies - The third shop in Diagon Alley. Purchase spells at the counter on the ground level (a waste of studs unless you're trying to get 100.0% completion). On the upper level you can enter passwords to instantly unlock some extras. Sometimes you simply cannot enter passwords. If that happens, try resetting the game and coming right back.
Gringotts - The last building in Diagon Alley. WL the gold pieces to open the door. Inside you can play ten bonus levels (provided you've earned enough gold bricks). For completing these bonus levels, you get a gold brick each. After you complete one, you open the stage builder mode. See the Bonus Levels section for instruction on getting through them.
Knockturn Alley - An off-shoot of Diagon Alley devoted to the Dark Arts. Reducto the gate in Diagon Alley to gain access. WL the planks in a cart to form stairs leading up to Igor Karkaroff's token. Jump on the cart and shoot it by targetting it to get launched up to the Bloody Baron's token. Shoot the chest near the end, then jump on the table to get launched to the Shifty Wizard's token.
Borgin and Burkes - The only shop in Knockturn Alley. Once you get all 200 gold bricks, you can build a door to a bonus level and unlock Voldemort. I must warn you that once you enter that gate, the continue story option in the Leaky Cauldron will no longer take you to Hogwarts, but will dump you in Knockturn Alley, so make sure you have EVERYTHING from Hogwarts before starting the level. There is a gold brick behind the counter.
Hogwarts
Home at last! And what a home it is.
Overview of Hogwarts
Below is a map that shows Hogwarts in its entirety. The purpose of this is to give you a general idea of the layout and a quick reference to get you from one room to another that is on the other side of the castle. Notice the blue lines? Those outline the one and only loop. At some point in the third year, a security troll will block the stairs in the Courtyard Corridor leading to the Main Hall. This loop is how you get around it.
The whole shebang
Detailed Maps
Marked on the detailed maps are gold bricks, character tokens, extra bricks, and students in peril. Underneath each map is a description of how to get each of these. I've also marked obstructions, what you need to get past them, and how to get past them, as well as provide links to maps of neighboring rooms.
Gryffindor Dormitory

Gryffindor Dormitory
Neighboring rooms: Gryffindor Common Room, TT Dorm
A - Ron (Hogwarts)
- Shoot the chest next to the door.
B - Gold Brick
- Shoot the canopies off all four beds.
C - Fall Rescue
- WL the plant on the trunk, then shoot the trunk.
Gryffindor Common Room

Gryffindor Common Room
Neighboring rooms: Gryffindor Dormitory, Dormitory Hall
A - Student in Peril
- Shoot the sleeping student on the couch. When he comes back out, shoot him again.
B - Gryffindor Boy
- Hidden behind the couch in the corner.
Main Stairs
Main Stairs
Neighboring rooms: Main Hall, Dormitory Hall, Muggle Studies, Dumbledore's Office
Professor Binns
- WL the candle in front of Dumbledor's Office.
Student in Peril
- Shoot the spider web on the very top landing.
Percy (Sweater)
- Shoot the two vases on the third landing, then shoot their flowers.
Gold Brick
- Near the door to the Main Hall is a painting of a quidditch player with a quaffle. Shoot it and the quaffle will be passed up to another painting. Go up the stairs and find this painting and shoot it. Shoot the third painting of a quidditch player to make the quaffle go all the way to the top landing. Head up there to claim your gold brick.
Main Hall

Main Hall
Neighboring rooms: Class Corridor, Main Stairs, Foyer, Courtyard Corridor, Library
A - Gold Brick
- Shoot the six candles. One above each of the suits of armor at the foot of the stairs, one above the door to the Class Corridor, one on each side of the gate to the Foyer, and one between the platforms in the middle of the balcony.
B - Student in Peril
- WL the books to make a series of platforms reaching up to him. Climb them and jump at him.
Class Corridor
Class Corridor
Neighboring rooms: Charms Corridor, Main Hall, Potions Room, DADA Room 1, DADA Room 2, Transfiguration Room, East Courtyard
A - Gryffindor Girl
- Shoot the idiot in the corner near the doors to the Main Hall and Charms Corridor. Shoot him again when he stops running. WL the basket near Potions Room. When he runs off the third time, he'll leave the token behind.
B - Lee Jordan
- Shoot the left gold bust.
C - Hannah Abbott
- WL all eight of the torches in the room.
D - Ernie Macmillan
- Use the mandrake to smash the six glass containers around the left stairs and on the upper left side.
E - Millicent Bulstrode
- Dark WL the cabinet.
F - Gold Brick
- WL the pieces onto the "H". Reducto the silver banner. WL the disconnected piece of pet tube, then send a pet through to the top left corner.
Charms Corridor

Charms Corridor
Neighboring rooms: Charms Room 2, Class Corridor, Charms Room 1
A - Student in Peril
- WL the red ball on the shelf.
Charms Room 1

Charms Room 1
Neighboring rooms: Charms Corridor, Charms Subroom 1
A - Boy
- WL the books on the shelf until the blue and brown books are sorted.
Charms Room 2
Charms Room 2
Neighboring rooms: Charms Corridor, Charms Subroom 2
A - Girl
- Shoot the four candles, two by the exit and two in the balcony.
B - Gold Brick
- As you exit Charms Subroom 1, you'll hopefully get blasted high enough to reach the brick.
West Courtyard

West Courtyard
Neighboring rooms: Garden, Courtyard Corridor, North Courtyard, Clock Tower, East Courtyard
Polyjuice Potion (Kill the pixie by the door to the Garden to access the cauldron.)
- After shooting the four gargoyles around the fountain and WLing the pieces, shoot a plant near 1 for the apple.
- After shooting the four gargoyles around the fountain and WLing the pieces, shoot a plant near 2 for the cherry.
- Shoot the armor at 3 for the hair.
A - Collect Ghost Studs
- Shoot the four gargoyles around the fountain, then WL the pieces.
B - Student in Peril
- Shoot one of the jerks jinxing the guy on the ground and they'll run away.
C - Hufflepuff Boy
- Once you can handle Mandrakes, get earmuffs from the wardrobe on the left side. Carry the mandrake by the door to the Courtyard Corridor around to the five glass jars that are along the outside walls of the room.
D - Ravenclaw Prefect
- Reducto the silver armor in the fountain, then ride the mop over the five yellow spots until they are gone.
E - Gold Brick
- Dark WL the red armor left of the door to the North Courtyard and mount the broom. Collect the formations of gold and blue studs to make the brick appear.
Foyer

Foyer
Neighboring rooms: Great Hall, Main Hall, Lavatory Corridor
Polyjuice Potion
- WL the blue thing at 1 for the cherry.
- Shoot the rolled up banner at 2 for the apple.
- Shoot the rolled up banner at 3 for the hair.
A - Student in Peril
- Shoot the banner high on the wall to the left of the doors into the Great Hall.
B - Gold Brick
- Shoot the four banners on either side of the doors to the Great Hall and on either side of the stairs to the Main Hall.
C - Harry (Blue Shirt)
- Behind the spiral stairs.
D - Witch (White)
- Dark WL the cabinet in the corner.
Potions Room

Potions Room
Neighboring rooms: Class Corridor, Potions Subroom
The Strength Potion (year 1)
- WL the snake at 1. Take the fang from its mouth and add it to the potion.
- WL the pieces at 2, then send Scabbers up the pet tube, knocking down the flower. Add it to the potion.
- WL the yellow wall at 3, then WL the skeleton inside until it drops an arm. Add it to the potion.
- Take a drink from the potion and pull the chain next to Snape to finish the lesson.
The Polyjuice Potion (year 2)
- Shoot the three bottles at 4 to make a plant grow with the cherries.
- WL the yellow wall at 3 and Immobilus the pixie inside, who drops the apple.
- WL the stack of stuff at 5 to get the hair.
- Drink the potion and choose Justin Finch-Fletchly. Talk to the portrait on the right to finish the lesson.
The Aging Potion (year 4)
- Shoot the lock off the trunk at 6, then carry the piece to the pump at 5. Jump on the raised part and your partner will jump on the lower one. Keep standing there and the leaf will pop out.
- WL the pieces blocking the bottom of the pet tube at 1. Send Crookshanks up the right path to free the bird. Shoot the bird when it's on the plate at 7, then WL the drumsticks. Now you can WL the banana from the fish tank.
- WL the trophy head at 3 to reveal a rune cabinet. Have Hermione open it. WL the pieces to make a work station just to the right. WL each combination of two colors (red and blue, red and yellow, blue and yellow) to make the snake appear.
A - Justin Finch-Fletchly
- Simply complete the polyjuice potion and he is automatically unlocked.
Herbology Room

Herbology Room
Neighboring rooms: Garden, Herbology Subroom 1
- Lumos Solem
- Shoot all of the devil's snare with Lumos Solem, causing some flowers to sprout.
- Shoot all of the flowers that just appeared near Professor Sprout.
- WL the cart in the bottom left corner.
- WL the pieces into another cart, then jump in.
- Shoot Ron down with Lumos Solem to end the lesson.
A - Gold Brick
- During and after the Mandrake Handling lesson, a gold brick is floating high above the ground here. Jump from the potted mandrake to the top of the wardrobe, and from here you can reach the brick.
Flying Lessons

Flying Lessons
Neighboring rooms: Garden
- Flying Lessons
- As Harry, rise up and shoot the gargoyle on the left. When the other takes flight, give chase and shoot him three times. The final part is to shoot the three large flowers on the vines, ending the lesson.
A - Harry (Quidditch)
- Dig up the five spots around the area.
B - Viktor (Dragon Task)
- Reducto the lock off the chest, then fly through the six hoops.
C - Gold Brick
- Reducto the lock off the chest, then fly through the six hoops.
South Courtyard

South Courtyard
Neighboring rooms: Bridge, Coutryard Corridor
Strength Potion
- Shoot the bushes at 1 for the arm.
- Shoot the bushes at 2 for the fang.
- Shoot the bushes at 3 for the flower.
- Shoot the devil's snare at 4, 5, and 6 to free up all the pieces.
- WL the pieces.
- WL the gyro between the posts.
- Drink the Strength Potion and pull the chain on the lower post to open the door to the Bridge.
Grounds

Grounds
Neighboring rooms: Quidditch Pitch, Bridge, Hagrid's Garden, Lake
Polyjuice Potion
- Kill the devil's snare holding the cherry at B.
- WL the hair from the sleeping student at 1.
- Kill the pixie at 2 for the apple.
A - Gold Brick
- Use Lumos to remove the vines from a rock near door to the bridge, then WL it upright. Shoot the rock to the right of the first one, then WL it out of the ground. WL the rock below the second into position. Using WL, guide the broom in front of each rock to clean the splats. When the splats are gone, the Gold Brick appears.
B - Student in Peril
- Use Lumos Solem on the devil's snare next to the path to Hagrid's Garden to free the student.
C - Percy Weasley
- There are four carrots to be WLed out of the ground. One is left of the path to the Quiditch Pitch, one is on the hill facing Hagrid's hut, one is to the right of the path to Hagrid's Garden, and one is near the rocks.
D - Fast Dig
- Use WL to construct a cloud. WL it left and right to grow four groups of flowers. WL these four groups to make the Red Brick appear.
E - Viktor Krum
- Dark WL the red and black rocket right of 1, then shoot its fuse. Ride the flying pumpkin (you may need to Immobilus some pixies first) to reach the token.
F - Cedric (Lake Task)
- Reducto the chains on the green rocket right of 1, then shoot the fuse. Ride the flying pumpkin to reach the token.
G - Ginny (Cardigan)
- Immobilus the pixie holding the blue rocket to the right of 1, then shoot the fuse. Reach the token with the flying pumpkin.
Quidditch Pitch
Quidditch Pitch
Neighboring rooms: Grounds, TT Quidditch Pitch
A - Gold Brick
- Jump on the bench right of the tent entrance and your buddy will raise it up. Jump onto the tent and walk to the left. WL the thingie. The brick appears on the ground.
B - Student in Peril
- WL the rolled up canvas in the corner to make a trampoline, allowing the student to jump off the platform safely.
C - Katie Bell
- WL all five red and gold flags.
D - Padma Patil
- WL all four green and silver flags.
E - Ravenclaw Boy
- WL the four yellow flowers by the concession stand.
North Courtyard

North Courtyard
Neighboring rooms: West Courtyard, Owlery Path
Strength Potion
- Shoot the flowers at 1 to make a snake appear. Shoot the snake to get the fang.
- Shoot the three bushes at 2 and WL the bones. When the skeleton falls apart, the arm is left.
- Shoot the brown contraption at 3 and it will regurgitate the flower.
A - Angelina Johnson
- Shoot all ten of the torches around the edge of the courtyard to make the token appear.
B - Hufflepuff Prefect
- Immobilus the pixies and shoot their chest. WL the Tetris pieces and jump up them to reach the token.
C - Slytherin Prefect
- Dark WL the chest, WL the seed that comes out, then WL the watering can. Jump on the flower and your partner will WL it to blow you up to the token.
Hagrid's Garden

Hagrid's Garden
Neighboring rooms: Grounds, TT Hagrid's Garden
A - Ron (Brown Jacket)
- WL the three mushrooms in Hagrid's Garden.
B - Student in Peril
- Shoot the checkered tablecloth on the picnic basket, then shoot the picnic basket again. Shoot the little thing it tosses out by the fire. WL the pale pumkin to free the student.
C - Gold Brick
- Shoot the niffler on the right two or three times and he'll chuck out some pieces. Have Fang dig along the back wall on the right end to free up more pieces. Shoot all three of the pumpkins, which leave behind a seed. WL it into the ground and it will sprout. WL the watering can on the left side to water the new plant, which pulls up more pieces. WL the pot by the fire. WL the basin in the upper left corner. WL it again when it's full to fill the pot on the fire. Shoot the checkered tablecloth on the picnic basket, then shoot the picnic basket, which spits out even more pieces. WL the pieces so you have three parts of a salt shaker. WL the white base first, then the clear shaker, then the grey top, causing the gold brick to appear over the pot. WL the food on the tablecloth into the pot, which boils. Ride the steam above the pot to reach the gold brick.
D - Amos Diggory
- Reducto the lock off the chest, then Riddikulus the boggart inside.
Lavatory Corridor

Lavatory Corridor
Neighboring rooms: Foyer, Bathroom
A - Hermione (Cat)
- Have Hermione open the rune cabinet, WL the pieces that come out, then WL the finished product.
B - Gold Brick
- WL the thingie through the maze. Your partner should WL the red pieces out of the way when necessary. Shoot the thingie when it comes out and follow it for the gold brick.
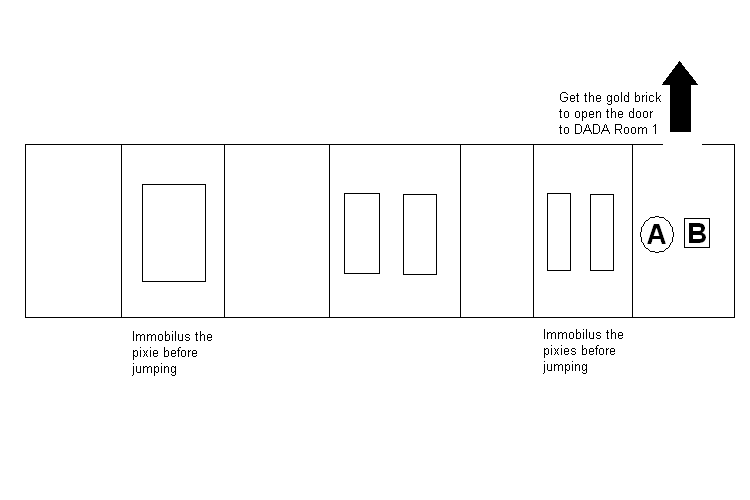
DADA Room 1

DADA Room 1
Neighboring rooms: Class Corridor, DADA Subroom 1, DADA Subroom 2
A - Station Guard
- In year 3 and after, WL the four torches on the wall.
B - Parvati Patil
- In year 3 and after, shoot the four fluttering books. Two are on the left side of the room, one is on the banister at the back, and the final one is inside the rune cabinet.
C - Ginny Weasley
- Dark WL the gate beneath the stairs.
East Courtyard

East Courtyard
Neighboring rooms: Divination Room, West Courtyard, Class Corridor
Strength Potion
- Shoot the bushes at 1 for the flower.
- Shoot the bushes at 2 for the arm.
- Shoot the bushes at 3 for the fang.
A - Oliver Wood
- Drink the strength potion and pull the chain near 1 to make some hoops appear. Fly through all of them to make the token appear up high.
DADA Room 2

DADA Room 2
Neighboring rooms: Class Corridor
A - Parvati (Ballgown)
- In year 4 and after, shoot the three spider webs in the room. One is on the left side at the front of the screen, one is on the right midway back, and the third is above the door at the top of the stairs.
B - Ron (Pyjamas)
- In year 4 and after, WL the four torches in the room.
C - Gold Brick
- In year 4 and after, Reducto the seven shiny silver things in the room to get the brick. Two are held by pixies that need to be killed with Immobilus, one is under the bird cage on the right of the room (WL the cage to move it out of the way), one is trapped by some vines on the left side (Lumos), one is inside the rune cabinet (Hermione), one is sitting in the middle of the floor and may need to be aimed at to hit, and the last one is the wall in the back right corner (it gets destroyed in sections).
D - Fast Magic
- Dark WL the black ball to get the red brick.
Dumbledore's Office

Dumbledore's Office
Neighboring rooms: Main Stairs
Strength Potion
- Shoot the armor at 1 twice to get the arm.
- Immobilus the pixie at 2 to get the flower.
- WL the beans into the same colored jars to get the snake fang.
A - Invincibility
- Approach Fawkes (the phoenix) and he just... catches fire, leaving the red brick behind.
B - Gold Brick
- Use Reducto to break the lock on the chest in the middle of the office.
C - Nearly Headless Nick
- Shoot the candle-like things on the rack.
D - Professor Dumbledore (Grey)
- Pull the chain in the loft. Destroy the model of the solar system that appears. WL the Sorting Hat to get the token.
E - Professor Dumbledore
- Dark WL the chest in the lower area behind the desk.
Muggle Studies

Muggle Studies
Neighboring rooms: Main Stairs
A - Gold Brick
- Shoot the picture of the postman on the left wall then WL the letter. Stack the desks next to the shelf, climb up, and shoot the thing on the top shelf. Shoot the television on the right side four times. With the three bunnies running in their wheels, you can get your gold brick.
B - Dudley Dursley
- Shoot the computer once to make a token appear on the monitor. Shoot it again to get the token.
C - Score x6
- Shoot the printer.
D - Mrs Mason
- Shoot the vacuum cleaner.
E - Mr Mason
- Shoot the bobblehead. Shoot the bobble head that pops out
Great Hall

Great Hall
Neighboring rooms: Foyer
A - Student in Peril
- Shoot the spider web to free the student.
B - Molly Weasley
- Reducto the shiny thing in the corner.
C - Character Studs
- Shoot the roast chicken on the table. After a lap around the hall, it leaves the red brick in the corner.
D - Colin Creevey
- Reducto the silver thing on the end of the bench.
E - Gold Brick
- Shoot the six sets of cups and pitchers around on the tables. Shoot the plates on the end of the right three tables to make platforms reaching up to the gold brick.
Bathroom

Bathroom
Neighboring rooms: Lavatory Corridor
A - Score x8
- WL the shower heads onto the pipes, then shoot the white handles to turn on the showers and make the red brick appear.
B - Student in Peril
- Shoot the stall on the left.
C - Madam Hooch
- Shoot the trash can, then WL the spray paint around on the wall until the face is complete.
Library

Library
Neighboring rooms: Main Hall, Restricted Section
Aging Potion
- Shoot the bottom window shade on the left, then WL the shutters. WL the torch that appears to light the statues. Shoot the statue under the painting of the red wizard. Pick up the leaf at 1.
- Lumos the vines off the chest at 2 and shoot it for the snake.
- Shoot the window shade at 3 and WL the shutters to get the banana.
A - Susan Bones
- After completing the steps to get the leaf ingredient for the aging potion, jump on the yellow flower. Your partner will WL it, raising you to the token.
B - Ravenclaw Girl
- Reducto the lock on the gate and WL the bbar off it. WL the pieces and shoot the radio. The token will appear after some skeletons come and get jiggy.
Restricted Section

Restricted Section
Neighboring rooms: Library
A - Gold Brick
- There are three wizard hats to shoot. One is on the right balcony, one is on the left balcony, and Immobilus the pixies in the back left corner for the third hat.
B - Student in Peril
- Get earmuffs from the left balcony and pot the mandrake on the right balcony.
C - Wizard (Red)
- Dark WL the panel, then kill the spider, the dementor, and the wasp for the token.
D - Alicia Spinnet
- Open the rune cabinet in the back right of the room and WL the pieces. Ride the cart and run over the five pink books to get the token.
E - Red Brick Detector
- WL the book to a book of matching color on the lower shelves.
Courtyard Corridor

Courtyard Corridor
Neighboring rooms: West Courtyard, Main Hall, South Courtyard
A - Madam Pince
- Shoot the three green panels. One of them needs to have a silver lock Reducto'd off of it first.
B - Doris Crockford
- There are nine torches between this room and the Main Hall that need to be WLed. One of them in this room must first have its lock Reducto'd.
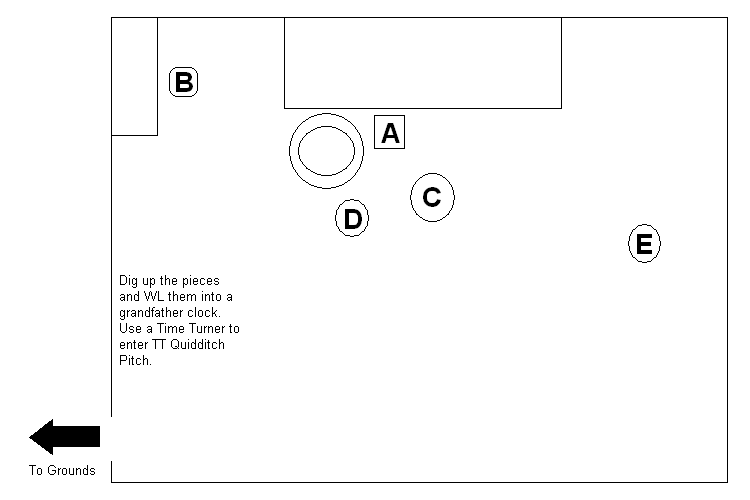
TT Quidditch Pitch

TT Quidditch Pitch
Neighboring rooms: Bridge
A - Gold Brick
- Dig up the nearby pieces and WL them. WL the book onto the stand. WL the book to open it, then WL the book again until the gold brick appears.
B - George (Quidditch)
- Dig up the pieces and WL them. WL the plants on both sides of the concession stand to make the token appear.
C - Stud Magnet
- WL the hammer and chisel around the ice block, sculpting it. When the statue is complete, shoot the red brick to make it drop.
D - Student in Peril
- Reducto the lock of the chest and WL it to free the student.
TT Hagrid's Garden

TT Hagrid's Garden
Neighboring rooms: Grounds
A - Student in Peril
- Shoot the pumpkin in the corner.
B - Gilderoy Lockhart (Green Jacket)
- Reducto the lock on the ax.
C - Petunia Dursley
- Dig the patch behind the barrel.
D - Gold Brick
- Dig the patch in the lower right corner, then WL the pieces uncovered. Dig up the pumpkins and shoot them. WL the pieces to make a chain. Pull the chain and
WL the pieces. WL the egg on the left to get the gold brick.
Clock Tower

Clock Tower
Neighboring rooms: TT Clock Tower, West Courtyard
A - Student in Peril
- Shoot the spider web.
B - Score x2
- Shoot the two chests, then WL the clocks onto the pedestals, matching the colors.
C - Vernon Dursley
- Have a parselmouth talk to the snake door, then shoot the end of the snake that gets stuck in the hole.
D - Gold Brick
- Shoot the painting on the left. WL the gear onto the existing purple gear to get the brick.
TT Clock Tower

TT Clock Tower
Neighboring rooms: West Courtyard
A - Milkman
- It's just sitting right there.
B - Madam Rosmerta
- Reducto the lock on the rune cabinet, then open it.
C - Gold Brick
- Shoot the painting in the back to get the blue pieces and open the rune cabinet to get the green pieces. WL them each to make hands for the clock face. You need your partner up here for the next step, so Lumos the vines in the back right corner to get the gargoyle head, then WL it onto the body, stopping the right stairs. Now WL one of the clock's hands while your partner does the other.
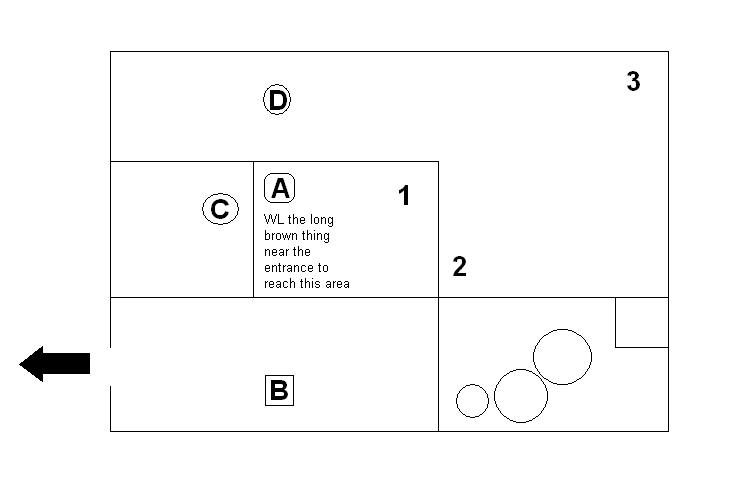
Herbology Subroom 1

Herbology Subroom 1
Neighboring rooms: Herbology Subroom 2, Herbology Subroom 3, Herbology Room
A - Fleur Delacour
- Reducto the lock on the chest, then shoot the chest.
Herbology Subroom 2

Herbology Subroom 2
Neighboring rooms: Herbology Subroom 1
Strength Potion
- Shoot the bush at 1 to get the flower.
- Get earmuffs from the underarea on the right and move the mandrake aside at 2 for the arm.
- WL the hanging pot at 3, then approach the biting plant for the fang.
A - Student in Peril
- Drink the strength potion and pull the chain to release the student.
B - Singing Mandrake
- Shoot the large plant on the right and pull the chain to open the door on the left. WL the pieces to make a ramp to the upper level. Carry the three mandrakes (one on the right, one in the underarea on the left, one on the ledge on the left [reached by a ladder formed by shooting two plants under the ledge]) up the ramp and pot them.
Herbology Subroom 3

Herbology Subroom 3
Neighboring rooms: Herbology Subroom 1
A - Drummer
- Kill the boggart at the end of the left balcony.
B - Professor Sprout
- Get earmuffs from the wardrobe on the right balcony (shoot the bench and it will blast you up there) and carry the mandrake around to five glass containers. One is under the right balcony, another is under the left balcony next to the door, one is under the left balcony behind the stairs, one is at the top of the stairs, and one is at the far end of the left balcony.
Owlery

Owlery
Neighboring rooms: Roost, Owlery Path, TT Owlery
A - Student in Peril
- Approach the rolled up canvas to release the student.
B - Hermione (Grey Hooded Top)
- WL the round thing on the ground to make a ramp to the token.
Roost

Roost
Neighboring rooms: Owlery
A - Gold Brick
- WL the pink feather. WL the pieces the picture leaves behind to get the gold brick.
B - Cho Chang
- WL the record to the turntable, then shoot it off. Reducto the silver chest in the corner for another record. WL this second one and shoot it off. Shoot and WL the right cabinet for the third record to be played, causing the token to appear.
TT Owlery
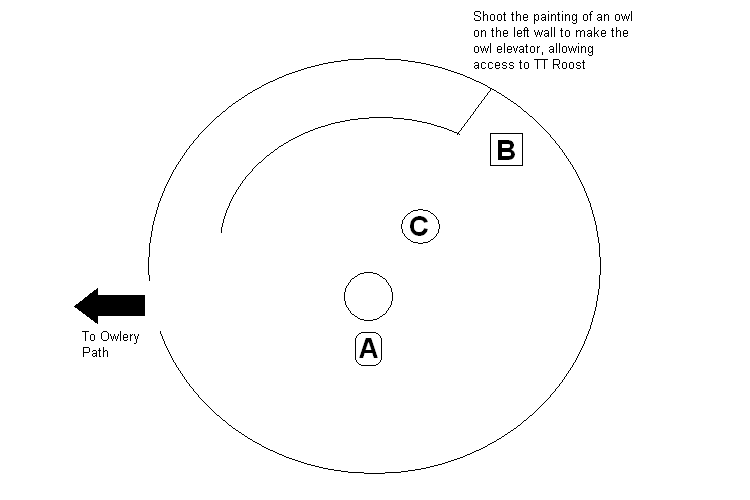
TT Owlery
Neighboring rooms: TT Roost, Owlery Path
A - Student in Peril
- Reducto the student stuck in the pedestal.
B - Gold Brick
- WL the three parcels into the correct hole according to color.
C - Barty Crouch Senior
- Reducto the lock on the cabinet where you start. WL the cabinet, then WL the pieces. Ride the scrubber over the five splats to get the token.
TT Roost

TT Roost
Neighboring rooms: TT Owlery
A - Gold Brick Detector
- WL the crank at the top of the screen, then WL the projected picture of the red brick.
B - Hermione (Hogwarts)
- Shoot the green thing on the table, then WL what the painting left behind.
Lake

Lake
Neighboring rooms: Grounds
A - Bassist
- Shoot the niffler that appears around here three or four times.
B - Student in Peril
- Shoot the three crates and WL the pieces to make a bridge to the student.
C - Ron (Tuxedo
- Cross the bridge you make to rescue the student in peril.
D - Gold Brick
- WL the fishing rod and WL the pieces you pull up. Mount the frog in the back
and swim through the gates that appear.
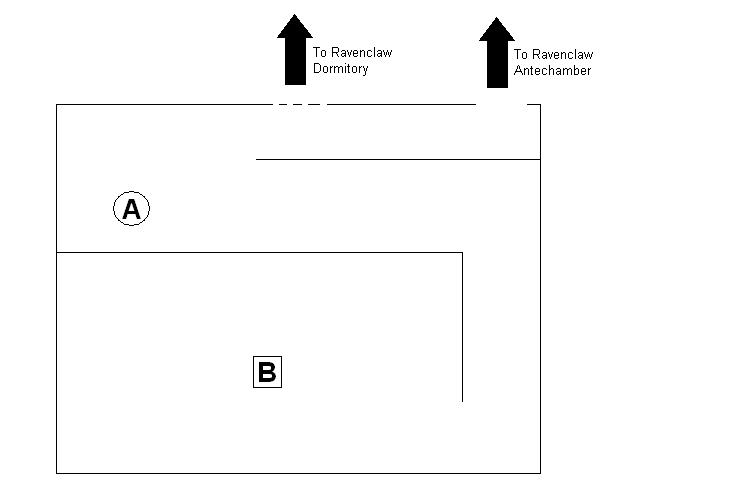
TT Dorm

TT Dorm
Neighboring rooms: TT Common Room
A - Dean Thomas
- Shoot the chest.
B - Gold Brick
- Shoot the trunk and jump in.
C - Seamus Finnigan
- Reducto the lock on the chest.
Slytherin Antechamber

Slytherin Antechamber
Neighboring rooms: Slytherin Common Room, Dormitory Hall
A - Rita Skeeter
- Reducto the four silver locks on the grates around the bottom pool. WL the pieces, then pull the chains in the two pools under the ramps. Ride the water spout to reach the token.
Slytherin Common Room

Slytherin Common Room
Neighboring rooms: Slytherin Dormitory, Slytherin Antechamber
A - Slytherin Girl
- There are five lamps to light with WL. One is near the door to the Slytherin Antechamber, one is by the windows in the left area, one is by the windows in the right area, one is on the right wall, and the last is on top of a shelf in the right area.
B - Slytherin Boy
- Shoot the painting on the left wall, then shoot the package that appears.
Slytherin Dormitory

Slytherin Dormitory
Neighboring rooms: Slytherin Common Room
A - Score x4
- It's just sitting there, waiting for you to find it.
B - Student in Peril
- Shoot the book case to free the student. He takes a few seconds to realize he's free.
D - Gold Brick
- Shoot the trunk at the end of a bed to reveal the brick.
Hufflepuff Antechamber

Hufflepuff Antechamber
Neighboring rooms: Hufflepuff Common Room, Dormitory Hall
A - Neville Longbottom
- Carry the mandrake around and smash the three glass containers.
B - Student in Peril
- Pot the mandrake.
Hufflepuff Common Room

Hufflepuff Common Room
Neighboring rooms: Hufflepuff Dormitory, Hufflepuff Antechamber
A - Student in Peril
- Shoot the plant in the fireplace.
B - The Fat Friar
- Shoot the painting, then shoot the cake, then shoot the cake again for the token.
C - Gold Brick
- Reducto the lock on the oven and WL the cake.
Hufflepuff Dormitory

Hufflepuff Dormitory
Neighboring rooms: Hufflepuff Common Room
A - Hufflepuff Girl
- Shoot the chest on the right wall and WL the pieces for the token.
B - Christmas
- Shoot the potted plant in the middle of the room. Shoot off all of the blooms to make the red brick appear.
Ravenclaw Antechamber

Ravenclaw Antechamber
Neighboring rooms: Ravenclaw Common Room, Dormitory Hall
A - Penelope Clearwater
- Shoot the gate on the left and WL the pieces.
Ravenclaw Common Room
Ravenclaw Common Room
Neighboring rooms: Ravenclaw Dormitory, Ravenclaw Antechamber
A - Gabrielle Delacour
- Shoot the chest on the balcony. The token appears a few seconds later.
B - Hogwarts Crest Detector
- WL the large black table, then the table by the fireplace, the chair by the fireplace, the black piece on the bottom of the screen, and a chair under the balcony. When what you've been WLing emits dust, shoot it and it will drop the red brick.
In this room are three gold books to be shot. Shoot the trampoline the book is bouncing on, then WL the book to its shelf and shoot it. The second book is on the shelf right of the door to the Ravenclaw Dormitory. The third book is under the wriggling box. Shoot the box, WL the book, and shoot it. The other two are in the Ravenclaw Dormitory.
Ravenclaw Dormitory

Ravenclaw Dormitory
Neighboring rooms: Ravenclaw Common Room
A - Gold Brick
- Shoot the second bed, then the gold book under it. Shoot the fourth bed and the gold book under it. Combined with the three from the Ravenclaw Common Room, this should get you all five books and the brick.
B - Student in Peril
- Shoot the cart with books on it to tame the sick book, which was apparantly a threat to the student.
C - Padma (Ballgown)
- Shoot the bed and bounce on it to get the token.
Charms Subroom 1

Charms Subroom 1
Neighboring rooms: Charms Room 2
A - Student in Peril
- Shoot the spider web.
B - Extra Hearts
- Dark WL the black ball.
C - Mad-Eye Moody
- Shoot the two white balls and WL the dragon parts where they belong.
Charms Subroom 2

Charms Subroom 2
Neighboring rooms: Charms Subroom 3
A - Professor Flitwick
- Riddikulus the boggart to win the token.
B - Student in Peril
- Lumos the vines to release the student.
Charms Subroom 3

Charms Subroom 3
Neighboring rooms: Charms Subroom 2, Charms Room 1
A - Character Token Detector
- Have a parselmouth talk to the snake door, then dark WL the black ball he gives you.
B - Gold Brick
- Lumos the vines from the clawed hand on the right of the gate, then the one on the left.
DADA Subroom 1
DADA Subroom 1
Neighboring rooms: DADA Room 1
Strength Potion
- Get the fang at 1.
- Immobilus the pixie at 2 and Riddikulus the boggart for the flower.
- Shoot the gears near 3 and WL the pieces. The arm is on the platform that lowers.
A - Student in Peril
- Apparantly there is a student trapped in the spider web, but I never saw him, before and after I shot the web.
B - Regenerate Hearts
- Riddikulus all five boggarts in this room. One is to the right of where you start, Lumos the vines behind 1 to find another, Immobilus the pixie at 2 to make him drop the boggarts chest, one is at 3 when the platform is lowered, and the last one is dropped when you pull the chain near the cauldron.
C - Viktor (Tuxedo)
- Shoot the seven lanterns around the room. Three are on the platform where you start, one is by 2, two are on the back wall, and one is by the cauldron.
D - Harry (Maze Task)
- Shoot the three banners across the back wall.
DADA Subroom 2

DADA Subroom 2
Neighboring rooms: DADA Subroom 3
A - Draco Malfoy
- Immobilus the four pixies swinging on the pendulums.
DADA Subroom 3
DADA Subroom 3
Neighboring rooms: DADA Room 1
A - Professor Quirrel
- Just make it across the jumps.
B - Gold Brick
- Immobilus the two pixies by the pillars. It's easiest to hit them from the first crack in the floor.
Potions Subroom

Potions Subroom
Neighboring rooms: Potions Room
A - Score x10
- WL the Tetris pieces to allow yourself to get up to the ledge. Easy.
B - Professor Snape
- Shoot the chest.
C - Gold Brick
- Polyjuice into an adult to cross the age line and claim the brick. It's very convenient that Professor Snape is unlocked nearby if you don't have any other adults.
Transfiguration Subroom

Transfiguration Subroom
Neighboring rooms: Transfiguration Subroom
A - Gold Brick
- Transfigure (with the red spell) three dummies from each lane before they reach the end.
B - Professor McGonagall
- Transfigure (with the red spell) three dummies from each lane before they reach the end.
C - Fred Weasley
- Hidden behind the chalkboard.
Divination Room

Divination Room
Neighboring rooms: East Courtyard
A - Hermione (Blue Top)
- Dark WL the cabinet.
B - Professor Trelawney
- Open the safe with Griphook.
Walkthrough
I've broken each level up by screens. For each screen you'll find the walkthrough followed by a section called Stud Hunters. By collecting a certain amount of studs, you earn True Wizard for the level and a gold brick. Follow the advice in Stud Hunters as you follow the walkthrough. Character Tokens, Students in Peril, and House Crests are listed after Stud Hunters. Most of these things cannot be obtained during story mode, so I've specifically listed what you'll need to get these hidden goodies so you'll know when to come back and get them.
The Magic Begins
Studs needed for True Wizard: 69,000
First Screen - inside the Leaky Cauldron.
All you have to do here is walk to the odd colored part of the floor by the back right corner of the room. Switch to Hagrid. Harry should stand on the odd floor, then use WL to rais it up. When Harry jumps onto the platform, switch to him. Walk up the stairs and press Z to pick up the glowing lego piece. Drop down and place it where the arrow is pointing on the door. Switch to Hagrid and use WL on the handle to open the door. Go through.
- Stud Hunters - Shoot barrels, use WL on the tables along the left and right walls, use WL on the mugs on the bar and shoot them afterwards, WL the cups on the middle table for a while, and you can shoot the large barrels that are on their sides three times instead of just once. There are hidden studs along the wall at the front of the screen, as well as around the corner in the back left.
Gryffindor House Crest
Need: Wingardium Leviosa
Use WL on the candles on the left side of the room (by the bar). Use WL on the rubble that once was the tables, making two pictures. When they're both made, the crest appears above the bar. WL the three stools in front of the bar, and, after shuffling up, you can walk up the ramp they make and jump to reach the crest.
Second Screen - Diagon Alley.
Use WL on the bricks lying on the ground to open the wall. At the end of the street is a cauldron that needs some ingredients. None of these are very far away. Just bring the red spider from the web on the left side, the flowers from the table on the right side, and WL the ice cream cart to make the popcicle appear, then put that in, too. When the road is clear, walk up to the door and have Hagrid stand on the orange circle and press Z to pull the lever, opening the door. Go on in.
- Stud Hunters - Shoot the crates and cages all down the street, check along the buildings, especially around blind corners, WL the purple banner above the first shop on the left's door, WL the big pair of scissors on the left side, WL the table and chairs on the awning on the right side. Near the end are some pieces to build a trampoline with WL. Jump on it as someone other than Hagrid and land on the awning on the left side, where there is a small fortune.
Slytherin House Crest
Need: nothing
In front of the first shop on the left is an orange circle. Stand in it and press Z to wave at the witch in the window, who gives you the crest.
Student in Peril
Need: Wingardium Leviosa
Halfway down the street is a brown table on the right. Make sure your partner knows WL, then jump on the table. Your partner will lift you up to where you can jump off onto the awning, where the student is.
Hufflepuff House Crest
Need: Wingardium Leviosa
Early on the right side is a barrel with brooms in it. WL it to dump it out. WL the pieces to make a sweeping vehicle. Ride it down the road to where the cauldron exploded and run over all the green splats, making the crest appear.
Third Screen - Grignotts main hall.
Simply walk to the goblin seated by himself past the others and press Z on the orange circle. As Griphook, press and hold Z on the orange circle in front of the lock between the two desks on the left side of the hall. With the gate open, walk through and have Hagrid pull the chain. Use the goblin to open the safe in here, then WL the pieces that come out. Press Z while standing on the orange circle.
- Stud Hunters - Shoot the clock near the entrance four times, shoot the writing desk, WL both chests on the left side, shoot both cabinets in the back corner, WL the four piles of books, shoot the three stacks of white pieces in front of the desks, shoot the cones on the front of the desks, WL some blue/green books on the desks, and shoot the empty chairs behind the desks. WL the debris at the back of the hall to make a platform to ride up to a ledge with blue studs. Walk along the perimeter of the room to find some studs hiding out of sight. WL the eight extinguished lamps on the desks to get a purple stud. Once you open the gate using the goblin, walk along the inside of the fence to find blue studs, and shoot the chairs. When the second gate is opened, check around the corners and shoot the chest on the right.
Ravenclaw House Crest
Need: Reducto
At the back of the hall (past all the goblins is a gate locked with a silver lock. Use Reducto on it to open the gate. Have someone with strength pull the chain to reveal the crest.
Tom the Innkeeper
Need: Reducto
After opening the gate with Griphook, Reducto the lock off the chest on the right and shoot it again.
Mr. Ollivander
Need: Reducto
After opening the gate with Griphook, Reducto the lock off the chest on the left and shoot it again.
Fourth Screen - outside the vaults.
Just walk to the left and have Hagrid pull the chain, then the goblin open the lock. Walk into the vault to go back outside. Walk into the shop with the arrow pointing to its door to finish the level.
- Stud Hunters - Shoot the three white piles and WL the two sets of three torches. Shoot the lamps flanking the vault doors to your heart's content for some pocket change. Have the goblin open the vault on the right. Shoot everything inside and follow the critter's gold stud trail to get a purple stud. You can WL a platform in front of the right vault and have your partner raise you up to get another purple coin.
Griphook
Need: Reducto
Reducto the locked chest just to your right when starting.
Harry Potter Games Lego Online to Play Easy
Source: https://gamefaqs.gamespot.com/wii/960493-lego-harry-potter-years-1-4/faqs/60509
0 Response to "Harry Potter Games Lego Online to Play Easy"
Post a Comment